Mes impressions photos

A l’époque de l'argentique j'utilisais majoritairement des pellicules négatif. J'étais assez raisonnable sur le nombre de pellicule que j'utilisais, car c'était toujours assez frustrant de constater qu'une partie des photos n'auraient pas mérité d'être tirées sur papier : mal exposées, mal cadrées, bougées,...
Pour les photos les plus réussies et que je faisais agrandir, je constatais, bien souvent, une dérive des couleurs par rapport au tirage original.

Ensuite est arrivé le numérique avec ses vertus pédagogiques et sa souplesse d'utilisation (visualisation immédiate des photos, multiplication des essais pour arriver au résultat escompté, mémorisation des données techniques, format RAW pour des traitements logiciel ultérieurs,...).

Et s'est à nouveau posé le problème d'un tirage de qualité pour profiter pleinement de mes plus belles images.

Crépuscule sur la Dent de Crolles II

Après différents essais avec différents sites photos sur le Web, un ami photographe m'a conseillé l'entreprise Saal Digital. J'ai eu l'occasion de les rencontrer au Salon de la Photo de Paris en 2015 et ils m'ont fourni un ensemble d'échantillons de leurs tirages papier (y compris FineArt) et de leurs tableaux photos.(...)

«Expose to the right» in photography in RAW format

We often read in the photographic literature that it is very interesting to «expose to the right» when shooting in RAW format.

In other words, slightly over-expose his pictures during shooting, then adjust the correct exposure in post-processing (eg in Lightroom).

I would like to share with you an analogy that explains the reasons of this technique.

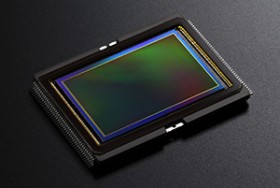
Capteur Canon 6D

A digital sensor is an analog-digital converter, that is converting image through the lens into digital information, usable by the electronic circuits of the camera, and more generally, compatible with the numeric world (storage, image processing, distribution,...).

Like any converter, it converts the relevant informations, the image, and adds unnecessary informations, called noise.

To use full capacity of the sensor and to get the best quality image in the RAW file, we can use an analogy with musical recording.

When recording music, they are two concepts, gain (recording volume) and distortion.
To illustrate these concepts, we can  remember vu-meter, which allows to adjust the level of the recorded sound without it reaches the «red zone», synonymous of distortion.

vu mètreThus, we will try to turn up the gain as much as possible in order to have the best quality of recorded sound. With this operation, we aim an optimal signal amplification with as less noise as possible (the best S/N ratio).

If the gain is not high enough on record, we will need to increase the volume when listening. In this case, we amplify the sound, but also the noise: the sound can be heavily polluted by noise.

Furthermore, do not turn up the gain too much, because it may generate distortion.
In this case, the signal with too high level can not be properly processed by the recorder (the signal is clipped, saturated) and can never be properly restored on subsequent listening (sound is distorted).

In photography, it is the same!

(...)

Zenphoto and Responsive Web Design

Until recently, the size of the screens of computers getting bigger every year. For web designers, it « enough » to expand the interfaces over time. Then came the iPhone and other Smartphones, the iPad, tablets and other Notebook, which are gradually revolutionizing the Internet and its uses.

A major challenge for web designers now is to build an interface readable on small screens, remain enjoyable on large one, taking into account the specific constraints to each medium (navigation with mouse or finger), in order to provide the best user experience as possible.

tailles-d-ecran

One answer is the Responsive Web Design.

Ethan Marcotte was the first to wrote the principles in an article published in May 2010. Principles which can be summarized in two words: flexibility and responsiveness and are based on three basic elements:

  • grids that can build interfaces using a variable number of columns in which are inscribed contents
  • flexible images where size and layout are set in response to the screen size
  • media queries that can detect which medium is used (or rather the size of the screen) and allow specific design (size, shape, position of elements, ...)

This technique is still young enough and uses the latest web standards: HTML5 and CSS3 (especially for media queries), and requires careful consideration from the designer's site on how to redistribute items based on resolution of the screen, or appearing/disappearing of some elements.

The Responsive Web Design offers therefore new possibilities for website design and provides tools and methods to give for each device the best design.

A Responsive Zenphoto theme

After creating two "static" themes for Zenphoto and regularly browsing on the Net with a SmartPhone, I see now the benefits of a photo gallery that fits the media.

After seeing the excellent theme zpSkeleton, I started a new adventure and I am working on a new Responsive Zenphoto theme. I hope to quickly achieve a beta that I will show you.

Quelques ressources

Informations about Responsive Web Design

Tools for building Responsive sites

Examples of Responsive sites (resize your browser to see the different responsive layout)

exemple3

ND 400 filter

It's amazing what you can do with a ND 400!

The ND 400 is a neutral density filter which reduces dramatically the intensity of light entering the camera (loss of 9 stops), which allows long exposures at any time of day.

So, during a sunny day on a beach, you can consider images with exposure time up to 30 seconds easily. Everything that moves during the long exposure time will blur or absent from the photo (clouds, water, waves, people,...)!

However, due to the very low light entering in the camera, most of DSLR's automatisms do not work (autofocus and light metering). The use of ND 400 is quite delicate and requires many manipulations to achieve his ends.

Cote Basque I

The basic technique

  • Mount the camera on a tripod (essential accessory for this kind of photo) and set sensitivity as low as possible (eg ISO 100)
  • In "Aperture Priority" (Canon Av mode) set an aperture of f/11 (to have a good depth of field while maintaining good image quality)
  • Compose your photo
  • Make the focus, the measurement of exposure, and note the exposure time (eg 1/60 s)
  • Turn off your autofocus
  • Attach the ND 400 filter on the lens
  • Switch to "Manual" (Canon M mode) and adjust the speed value / aperture
    • keep the same aperture (eg f/11)
    • use a time speed corresponding to your initial measurement -9 EV (eg : 1/60 s gives a value of 8 s)
  • Shoot with a remote control (again, almost indispensable accessory to avoid camera shake)
img_5221

Some tips

  • Reflex offer some options to minimize blur due to vibrations (displacement of the mirror at the shooting).
  • A long exposure increases the digital noise on the picture. Reflex offer some options to reduce this noise. Remember to enable or disable these options to suit your needs and results, knowing that the DSLR need a fairly long time (equivalent to the exposure time) to limit noise on the picture.
  • Think to shoot in RAW format (instead of JPEG). With software like Lightroom or DPP, this will allow you to correct the defects of exposure or white balance (the ND 400 have a tendency to derive the color to blue-magenta).
  • The modern digital SLR allow to use the rear screen and provide an « exposure simulation » function which displays and simulates how the brightness of the actual image will look.
    This feature greatly simplifies the use of ND 400 filter, the rear screen then allows you to setup speed, aperture and focus, and seeing the results on the screen, even with the ND 400 mounted on the camera lens!

Bonus tip

It is not always easy to calculate the speed value to use depending on the initial metering without the filter. A simple method is to have a table of EV (Exposure Value).
In my example, the couple f/11 – 1/60 s at 100 ISO gives an EV 13. The ND 400 is going to move to EV 4 (-9 stops), which gives the speed value to use, here 8 s.

Here are two sites where you can find and print tables of EV at 100 and 800 ISO:

img_5213